
From toilet to chamber. See inside the line.
Inspection, root removal and assessment for local repair — above ground and inside the pipe.
Silent demonstration. Play, pause, or move between the stages. Full description of the demonstration
Reduced motion is enabled. Select individual stages without playback, or read the full description.
Enter through the inspection chamber.
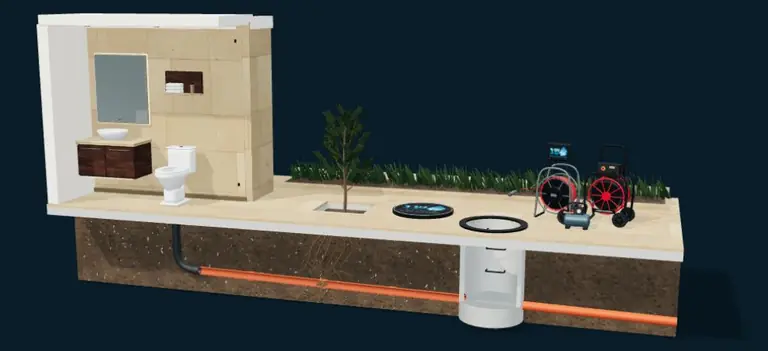
The orange drain connects the toilet to the chamber beneath concrete and soil. A cutaway exposes the line and its sockets. The camera enters from the chamber toward the building.
Locate the roots' entry point.
The lens and LEDs face forward. The monitor shows a dense root mass obscuring most of the pipe ahead. The outside cutaway traces the roots from the tree to their entry through the joint.
Remove roots under camera observation.
The cutter enters ahead of the camera. Its linked chains open as they rotate and remove the roots. The chain and tool must suit the pipe material and condition.
Inspect after root removal.
After cutter withdrawal and debris clearance, the camera pauses on the cut root ends and the joint recess. The blockage is removed, but cutting does not seal the defect: roots can return without a suitable repair. Cleaning and preparation are completed before the patch is installed.
Press the repair wrap against the wall.
The camera follows the inflatable packer and its resin-saturated glass-fiber wrap into the pipe. The wrap is positioned across the defect and pressed against the wall by inflation. After curing, the packer is deflated and withdrawn, leaving the patch in place.
Inspect the full sleeve and beyond its edge.
After packer removal, the camera re-enters, pauses at the subtle profile of the lined joint and continues along the full patch and beyond its far edge. The sequence ends with the toilet, line and chamber together.
Enter through the inspection chamber.
The orange drain connects the toilet to the chamber beneath concrete and soil. A cutaway exposes the line and its sockets. The camera enters from the chamber toward the building.
Locate the roots' entry point.
The lens and LEDs face forward. The monitor shows a dense root mass obscuring most of the pipe ahead. The outside cutaway traces the roots from the tree to their entry through the joint.
Remove roots under camera observation.
The cutter enters ahead of the camera. Its linked chains open as they rotate and remove the roots. The chain and tool must suit the pipe material and condition.
Inspect after root removal.
After cutter withdrawal and debris clearance, the camera pauses on the cut root ends and the joint recess. The blockage is removed, but cutting does not seal the defect: roots can return without a suitable repair. Cleaning and preparation are completed before the patch is installed.
Press the repair wrap against the wall.
The camera follows the inflatable packer and its resin-saturated glass-fiber wrap into the pipe. The wrap is positioned across the defect and pressed against the wall by inflation. After curing, the packer is deflated and withdrawn, leaving the patch in place.
Inspect the full sleeve and beyond its edge.
After packer removal, the camera re-enters, pauses at the subtle profile of the lined joint and continues along the full patch and beyond its far edge. The sequence ends with the toilet, line and chamber together.
Full description of the demonstration
The cutaway shows a bathroom, paving, soil and an inspection chamber. A 50 mm inspection camera enters a 110 mm outside-diameter pipe (4-inch class) with an example 100 mm internal bore. Thick branching roots descend from the tree and continue in the soil below the pipe; fine feeder roots enter through the defective joint. After repair, external roots remain in the soil and the bore is clear. The following describes the visual sequence; work and curing times are condensed.
Enter through the inspection chamber.
The orange drain connects the toilet to the chamber beneath concrete and soil. A cutaway exposes the line and its sockets. The camera enters from the chamber toward the building.
Locate the roots' entry point.
The lens and LEDs face forward. The monitor shows a dense root mass obscuring most of the pipe ahead. The outside cutaway traces the roots from the tree to their entry through the joint.
Remove roots under camera observation.
The cutter enters ahead of the camera. Its linked chains open as they rotate and remove the roots. The chain and tool must suit the pipe material and condition.
Inspect after root removal.
After cutter withdrawal and debris clearance, the camera pauses on the cut root ends and the joint recess. The blockage is removed, but cutting does not seal the defect: roots can return without a suitable repair. Cleaning and preparation are completed before the patch is installed.
Press the repair wrap against the wall.
The camera follows the inflatable packer and its resin-saturated glass-fiber wrap into the pipe. The wrap is positioned across the defect and pressed against the wall by inflation. After curing, the packer is deflated and withdrawn, leaving the patch in place.
Inspect the full sleeve and beyond its edge.
After packer removal, the camera re-enters, pauses at the subtle profile of the lined joint and continues along the full patch and beyond its far edge. The sequence ends with the toilet, line and chamber together.
Slow-motion 3D illustration of a 110 mm outside-diameter pipe (4-inch class), using an example 100 mm internal bore. Removing roots does not repair their entry point. A local patch requires prior inspection and preparation; equipment dimensions, site conditions and curing times vary.